Aadhaar eSign uses the PKI to generate a public+private key pair on top of Aadhaar eKYC which verifies user identity. Since Aadhaar is a user identity, you can call Aadhaar eSign as an identity linked electronic signature.
The signature certificate associated with your Aadhaar eSign is valid for 30 minutes only. Thereafter, the private key is destroyed to prevent misuse. However, it doesn’t mean that the transaction you agreed to while signing has become invalid. Hence, it is a much more secure way of digitally signing electronic documents.
Validating Aadhaar Esign
The signature associated with the Aadhaar Esign is valid only for 30 minutes, which means the private key associated with this signature is destroyed. This by no means implies that the document on which this signature was placed and terms agreed upon during the signing process get invalid.
30 min validity — what is it then?
During these 30 minutes, when a file is opened in a PDF reader that can verify signatures, the signatures are shown as validated automatically. After the 30 minutes when the private key expires, you will need to click on validate signature. The PDF reader verifies the entire signature certificate chain and the document and once the document and chain are verified, it shows a green tick depicting validity of the signature.
This might look a bit odd, but you can understand this by an analogy. Imagine you sign on a PDF using a DSC dongle, save the PDF and close it. Now when you open the PDF in a reader, the reader can verify it against the dongle right away and since the dongle contains your private key that was used for signing, it shows validated as soon as the file is opened. Now if you send this signed file to someone the other person will have to allow his/her reader to verify the signature certificate from the root CA over the internet. The root CA (Which in this case is CCA) checks if the signing was done using one of the signer certificates issued by them and that the chain is not tampered. Then the reader checks if the digests of the document on which signature was placed and the one which is opened for validation are the same or not. When the above two steps successfully validate, the reader shows a green tick depicting success.
Now, in the first 30 minutes after the signing, you can see a green tick directly since till then the private key is not deleted and is as good as a connected dongle. After the 30 minutes you have to allow the reader or specifically ask the reader to validate the signature and during this your reader will connect with root CA for validation. The second scenario can be thought of as you sending a PDF to someone and he/she validating it without the private key.
Validating Aadhaar eSign using Adobe Acrobat DC
Validation of Aadhaar eSign involves the following steps:
Open the signed document in Adobe acrobat DC. If the 30 minutes validity period has elapsed, you will see a band on top of the document, which says At least one signature requires validating. You will also be able to see a big ? on the position where the signature was embedded depicting that signature requires validation.


Click on the box with a yellow question mark to open a signature validation dialog box as below.
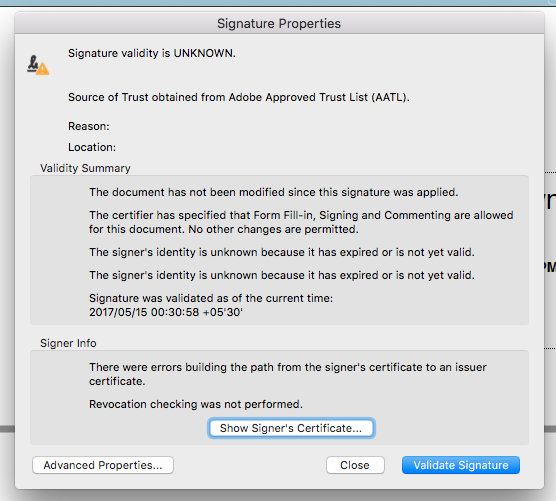
Click on Show Signer’s Certificate to open certificate details.

Click on the trust tab to add this certificate as trusted certificate. Click on Add as trusted certificates.

Select the checkbox saying “Use this certificate as a trusted root” and also select trust this certificate for “Certified documents” as in the below picture.

Close these dialog boxes by clicking on OK and click on the “Validate signature” button on the signature properties dialog box to see a success mark saying signature is valid. Close this dialog box.

On the document you will be able to see a green tick depicting that all the signatures were validated successfully and that the document is correctly signed.

You can also view more details about the signature in the signature panel, by clicking on the “Signature Panel” button on the top bar.

Follow this video for a step by step process of validating Aadhaar eSign on a PDF document.
Other tools
You can also use Foxit PDF Reader or any other standard PDF reading tools for opening the signed documents and validating the signatures.
Signing payloads and other docs using Aadhaar Esign
Using Aadhaar eSign you can very much sign your XML and JSON payloads or for that matter any other document types. We will treat them in another post. Stay tuned.
If you still have any queries or questions, feel free to share them in the comments below.
References:
https://helpx.adobe.com/acrobat/using/validating-digital-signatures.html
https://groups.google.com/forum/#!forum/aadhaarauth
http://www.e-mudhra.com/esign-service.html
https://authportal.uidai.gov.in/static/d3_4_security_policy_framework_v1.pdf